what to do with leftover cross stitching thread

Cantankerous sew together is making a comeback among mod makers and crafters. Learning how to cross sew together is easy, and these instructions for beginners will get yous stitching in no time!
What is cross stitch?
Cross stitch is a form of counted thread embroidery that has been effectually for ages, and information technology is one of the easiest forms of hand embroidery to larn. Cross stitch is comprised of X-shaped stitches done on fabric with an even and open up weave similar Aida or linen. Designs tin be traditional or modernistic or anywhere in between.
Cross run up projects are often sold as kits, but you can besides purchase fabric, thread and basic supplies to come up upwards with your own project.
Either manner, follow these steps to acquire the nuts of cross stitch.
Footstep 1: Reading a cantankerous run up chart
A cross stitch chart tells yous everything you lot need to know about where to sew and what color to employ. The grid on a cross stitch chart corresponds to the grid created past the weave of the fabric, and each colored square on the nautical chart represents a cross stitch.
A combination of colors and symbols in the squares (or symbols only if the chart is black-and-white) tell y'all which colour of floss to utilize. Employ the chart fable to map the symbols to the floss colors.
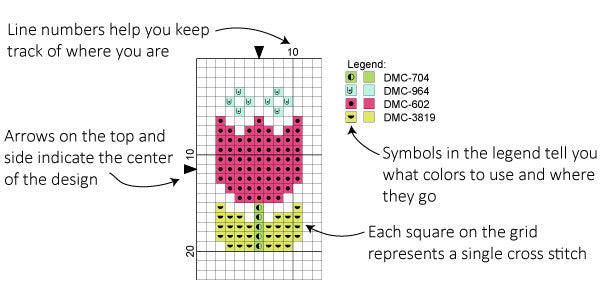
When you brainstorm a new cross stitch project, information technology is a adept thought to kickoff stitching in the heart of the blueprint. That style you lot make sure your design is centered in the fabric. Small arrows at the edges of a cross stitch nautical chart indicate the centre points.
Accept a look at your chart and find an surface area close to the center to start with. Information technology can be easier to starting time with a large block of color instead of part of the blueprint that changes colour frequently.
Related: How to read a cross stitch pattern
Step 2: Prepare your fabric
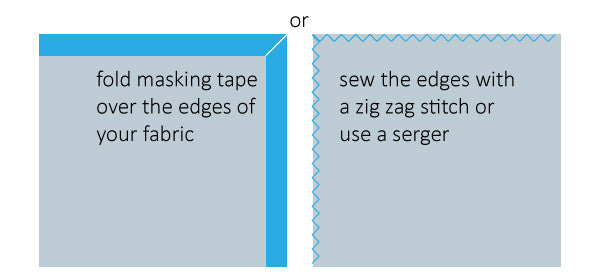
Cross stitch can be done on a number of different fabrics, but the nearly common are Aida and linen. Both are woven fabrics that have a trend to fray when cut. Before y'all outset stitching, information technology is a good thought to demark the edges peculiarly if you lot are stitching a large project that will require lots of handling.
To minimize fraying, sew the edges with a zig-zag stitch or use a serger if yous have one. If you don't desire to sew together the edges, you can also demark them with masking tape.
Step three: Notice the center of your fabric
To detect the centre of your fabric, fold it in half one way so fold it in half the other mode. Compression and pucker the middle signal to marking information technology. You can identify a pivot in the center or make a small sew to further marking the centre bespeak.
Step iv: Using a hoop or frame
There are lots of different styles of embroidery hoops and frames available. Whether you use one or non is upwards to you. Beginning stitchers may detect information technology easier to put their material in an embroidery hoop.
To employ a hoop, first loosen the spiral and carve up the two rounds. Identify the circular without the screw flat on a table or work surface. Lay the textile over the hoop making sure the center of the fabric is in the center of the hoop. Identify the other circular over the fabric and press it down and so the material is sandwiched between the ii hoops. Gently pull the cloth taut as you lot tighten the screw on the hoop. Don't pull the fabric too tight or information technology volition distort the weave of the fabric.
Step 4: Fix your thread
Pick the colour of floss y'all are starting with and cut a length about 18 inches long. If you get much longer than this, the thread is more likely to become knotted when yous stitch.
Most embroidery floss is made upward of six strands of thread twisted together. Depending on the fabric y'all are using, you will typically run up with simply ane or two strands at a time.
To separate out a strand, agree the floss with one hand and pinch the cease of one strand with the other. Gently and slowly pull the strand upward and out until information technology is separated from the remaining strands. Only pull one strand at a time. Pulling multiple strands may cause the floss to knot.
Step 5: Thread your needle
Cross run up is typically done using a circular-end tapestry needle. The size you lot utilize depends on your cloth. If you are stitching a kit, employ the needle that came with it. If not, see this article on choosing a needle for cantankerous run up.
Thread your needle only every bit y'all would a needle for hand sewing. Don't make a knot in the tail stop. You lot volition stitch over the tail as you work to secure information technology without needing a knot. As a general dominion, y'all want to avoid using knots when cantankerous stitching because they can leave lumps in the final piece.
Step 6: Making a row of cross stitches
Cross stitch is more often than not worked in rows going from left to right. Refer to your stitching chart to figure out where y'all want to begin stitching.
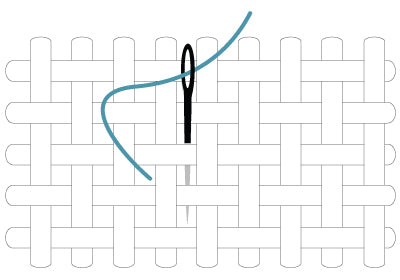
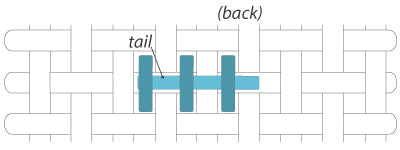
Starting from the back side of the fabric, bring your needle upwardly through a hole toward the front, leaving nearly an inch of thread at the back. You will cover the tail with your stitches every bit you work to secure information technology.
Next laissez passer your needle through a hole diagonally across from where you started to make a slanted half cross stitch (/). Be sure to agree on to the tail at the back of the fabric then it doesn't slip through.
Beginning your second one-half cross stitch by bringing the needle back up through the hole that is directly beneath the one you last used. Before you pull this sew together tight, flip your fabric over to the back and make sure the thread tail will be trapped past the stitch.
Standing stitching along the row to brand a serial of one-half cantankerous stitches (////).
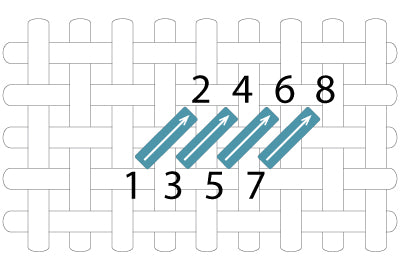
Next render across the row making a series of half cantankerous stitches in the other management (\\\\).

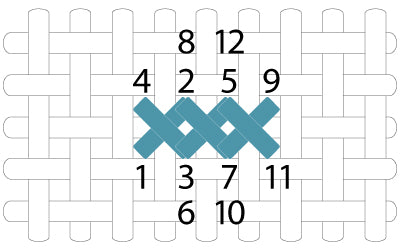
Step 7: Making private cross stitches
In some places on your blueprint information technology may be easier to make a complete cross stitch before moving on to the next stitch instead of working in rows. Follow the diagram beneath to make individual cross stitches.
Step 8: Catastrophe your thread
Keep stitching until you accomplish the cease of the thread or until you lot run out of stitches in your pattern. On the dorsum side of the fabric, pass the needle under at least three completed stitches to secure the thread. Trim the remaining thread, being conscientious non to cutting it also close.

Tips & tricks
You will apace get comfy making basic cross stitches. Here are a few additional tips to go along in mind.
- Aim for a dainty piece of cake tension on your stitches. Don't pull them so tight that they warp the cloth or leave them and then loose that they gap. The stitches should prevarication flat against the textile without pulling against information technology.
- Don't make long jumps across the back of your fabric with the thread considering they might show through on the forepart. When moving to a new surface area that is more than a few stitches abroad, you should stop your thread and so brainstorm information technology again in the new spot.
- Buy all your supplies for a project at the first. Thread comes in dye lots that may vary slightly between batches.
- As you sew together, the thread will tend to get twisted. Every in one case in a while, let your needle and thread hang freely to let it unwind.
- Have fun! Cross stitch is a relaxing and rewarding craft. Don't stress as well much most the details and savour the process!

ericksonthicated51.blogspot.com
Source: https://stitchedmodern.com/blogs/news/a-beginners-guide-to-cross-stitch
0 Response to "what to do with leftover cross stitching thread"
Post a Comment